


When restoring a 150-year old floor, modern solutions do not always apply. The techniques and materials needed to do a successful historical restoration can vary wildly, and project timelines can be unpredictable. The reward for navigating these challenges, though, is a tremendous sense of satisfaction.
“Historical renovations can be a niche thing. A lot of people don’t want to take the time to do them,” explains John Alford of Alford’s Custom Hardwood Floors out of Loveland, Ohio. “It helps if you can embrace uncertainty, as you never quite know what you’re getting into with a project. This was certainly the case with a recent job I was involved in with a floor in a very old home in Winchester, Ohio.”
Alford was asked to assist with restoring floors installed in 1864. The goal was to bring it back to its original state.
“The floors were hand-scraped, 1” thick red oak. There had been some repair work done where holes had been cut in the floor to accommodate old airconditioning ductwork and electric,” says Alford.
In addition to the challenge of matching the existing wood, Alford realized nothing about this installation was traditional.
“There was no tongue-and-groove present. The flooring was 1” thick, square-edged wood and had been face-nailed with large cut nails into oak floor joists,” explains Alford. “These were nails that I could not pull out. I had to break them off.”
The lack of tongue-and-groove made the installation easier for Alford after he removed the old wood.
“I was able to cut the wood square, put it down, drill it, and then re-nail it with cut nails,” explains Alford. “That said, finding the nails I needed was a challenge, as was figuring out how I was going to match the color.
Alford could still see bandsaw marks in the flooring from when it initially was cut. He knew the marks could not be sanded out.
“The patina from the bandsaw marks was so far down into the wood. It was going to be a challenge to try to match this. As wood ages, it darkens to different hues. These floors had aged for more than 150 years. Somehow, I was going to have to duplicate that aging.”
Before he could determine how to match color, Alford first needed to settle on what wood he would use.
“I was struggling mightily with how to approach the color, and I didn’t know if I needed to use red oak or white oak,” explains Alford. “At first, I thought I would be able to stain the wood, but after doing some testing, I saw that was not going to be possible.”


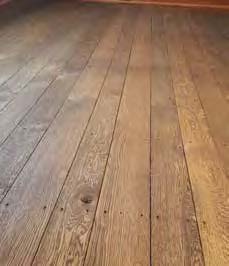
To add the patina back into the wood, Alford decided to use reactive chemicals. For wood selection, he chose white oak.
“I believed white oak would be easier to match the patina, due to its higher tannin content. I ended up chemically fuming the boards once they were installed. This process worked well, and I matched the color after going through a few test pieces. If I had used red oak, the boards could have taken on a completely different color,” explains Alford.
Sanding a floor filled with cut nails that were face nailed into the floor was another challenge for Alford. He had to first set the nails before he could begin sanding to not hit the nails with his sander.
“Trying to set the nails was difficult because both the nails and the wood underneath were so hard. I ended up going to a hardware store and getting an air hammer with a chisel point on it,” explains Alford. “This was the only way I could get the nails set before I could move on to the sanding process.”
It took Alford an entire day to set the nails on the 700 square feet of flooring with the air hammer. Sanding the floor flat with a drum sander also took extra time due to the varied nature of the floor’s surface.
“To sand the floor flat, I first started with 12 grit. I ended up going over the floor five times before I could get it flat enough to consider it a usable, satisfactory floor,” explains Alford. “I then ended up staining the floor a dark walnut color from DuraSeal. It didn’t end up darkening that much, but it did help blend in some lighter areas and made it more uniform. The result is something that I’m very proud of.”
Alford says that doing historical renovations can be a rewarding and profitable endeavor, provided you allow yourself enough time to do the job.
“If you are working on a historical home, know what you are getting yourself into. This floor took me the better part of two weeks to repair and sand. You cannot expect to go in and bang a job like this out in a few days.” explains Alford. “Add more time on top of what you think it will take, just to account for the ‘uh oh’ factor. It’s when you run into things that you don’t expect that you can lose money.”